


The commercial spraying industry continues to improve technology. At this point, incremental gains can make a tremendous impact and that incremental gain can be as smaller than a 60 micron droplet. If you have a new spray rig, you're probably not alone. Favorable grain prices paired with government payouts related to COVID-19 have allowed many operations to afford asset upgrades this past year. Maybe that asset upgrade came with Pulse Width Modulation technology? If so, this post is a must read for you prior to sizing your spray nozzles this season.
Speak at length with anyone involved in the ag sprayer industry about the new advances in sprayer technology, and there is a solid chance you'll hear the phrase "pulse-width modulation" mentioned. Although the technology isn't exactly new, advancements in spray nozzle design and overall efficiency of pulse-width modulation (PWM) spray systems arrive on the market every year, along with a slew of new PWM spray nozzles.
Following up on our article on sprayer nozzle sizing, we'll focus on explaining how PWM systems work and provide you example-based guidance for how to size a PWM spray nozzle on your own. We'll also explore the benefits of PWM spraying and why it may be time to consider making the switch from a conventional sprayer system to one outfitted with PWM spray nozzles and accessory components. Read on for all the details and be sure to use the table of contents to help you get around.
Contents
Pulse-width Modulation Explained
Pulse-width modulation was first developed for the agriculture industry in the 1990s by Dr. Ken Giles, a professor of Biological and Agricultural Engineering at the University of California, Davis, and Capstan Ag Systems. For many farmers and agronomists today, however, pulse-width modulation still presents considerable degrees of uncertainty and understanding. So, let's clear up the confusion.
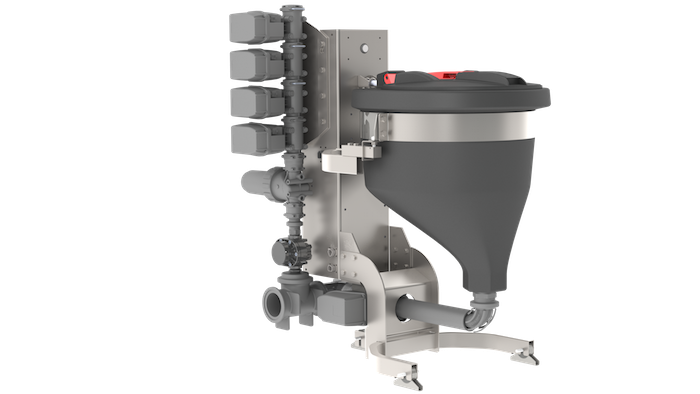
Pulse-width modulation, in ag-related terms, refers to how liquid flow rates are controlled via an electronic signal and shut off valve. Unlike conventional sprayer booms, a PWM system features nozzle bodies each equipped with an electric solenoid. As this solenoid turns on and off-typically an average of 10 times a second-an intermittent, pulsed spray is created through the nozzle. The proportion of time that the solenoid is open is known as the pulse width or duty cycle. It's this percentage of time the nozzle is open vs. closed that ultimately dictates your rate of application.
Cross-section illustration of a PWM solenoid-actuated nozzle body.
Because duty cycle plays such a significant role in determining proper sprayer calibration for PWM operation and PWM nozzle sizing, it's best we dive a little deeper into how this concept works. That way, you will know exactly how to choose the proper size spray nozzle for your specific agricultural operation.
Duty Cycle - The Driving Force Behind PWM
One of the limitations of conventional sprayer systems is that nozzle flow varies indirectly with sprayer pressure. As the sprayer speeds up, the system must adjust pressure to also adjust flow rate to deliver the same application rate per acre. Generally, a device called a rate controller automatically recalculates the necessary adjustments for you. So, when the sprayer increases speed, the rate controller causes spray pressure to increase as well until the flow rate sensor shows that the nozzle flow is enough to maintain the target application rate desired.
There are two related problems with these conventional spray systems. First, pressure must be increased significantly in order to increase flow rate as speed is increased. For instance, nozzle pressure must be doubled for nozzle flow to increase by just 41%. Moreover, pressure must be tripled to increase flow by 73%. Most sprayer pumps cannot achieve this doubling or tripling of their output while increasing flowrate.
Secondly, sprayer tips are very sensitive to changes in spray pressure. Go too slow and the lower pressure can cause the spray pattern to collapse. The result is poor, inconsistent coverage. Drive too fast, though, and your droplet size becomes finer, creating drift problems. This delicate balance means traditional sprayers must remain within a very specific, narrow speed range, which is not always possible given field conditions or with variable rate applications.
A key aspect in PWM systems is that spray nozzle output is no longer tied solely to sprayer pressure. Instead, PWM systems focus on duty cycle. Again, duty cycle is the proportion of time that the solenoid is open/on, meaning the percentage of time that your spray nozzles are actually spraying.
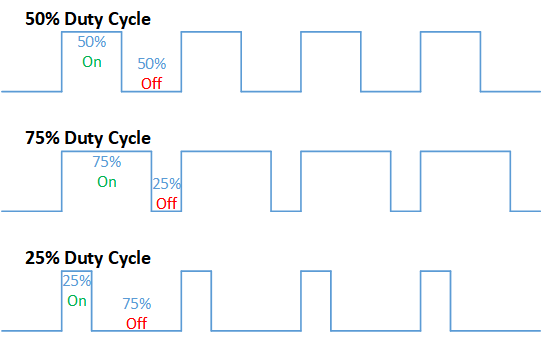
Typical duty cycle ranges are between 20-100%. Although lower duty cycles are possible, they are not recommended since droplet size and spray pattern can become inconsistent.
During operation, every nozzle can spray at its maximum flow (100% duty cycle) or a fraction of its flow capability. That means a nozzle operating at a 20% duty cycle will deliver about one-fifth of the flow of a spray nozzle spraying 100% of the time. Even so, the pulses occur so quickly that spray pattern and droplet size won't be adversely affected.
What does this mean in practice? For one, while duty cycle is still linked to changes in sprayer speed, the spray pressure remains constant. This enables a sprayer operator to make pressure adjustments to maximize coverage or drift control independent of speed and the rate of application. The end result is a spray application that is not only more accurate but also more consistent across diverse field conditions.
Calculating Duty Cycle
Duty cycle directly correlates to ground speed. When calculating duty cycle to correctly size your PWM spray nozzles, you want to aim for an average speed around 75% duty cycle. For example, if you figure you'll travel between 10 and 20 MPH while spraying, you'll want to choose your spray nozzle for an average speed of 15 MPH-or 75% of your maximum speed. This gives you plenty of flexibility to adjust the duty cycle up or down if you experience unexpected changes in speed without compromising your droplet size or spray pattern integrity.
Selecting the Appropriate Spray Nozzle for PWM Systems
Since the means of controlling nozzle flow rate is different between traditional sprayer setups and those with pulse-modulation, sizing PWM nozzles likewise differs a bit from conventional spray tips. This means that you won't necessarily be able to use traditional flow rate tabulation charts to size your nozzles. No need to fear, though. The PWM spray nozzle sizing process is still easy to understand.
There are three things to remember when selecting PWM nozzles. For starters, you want to always choose wider angle spray nozzles for pulse-width systems. One of the biggest concerns regarding PWM spraying is the risk of application "skips" as you move through the field. Wider angle nozzles such as 110° flat fans ensure you'll produce enough overlap in your spray coverage to eliminate skipping.
Additionally, you'll want to avoid using air-inducted spray nozzles for PWM spraying. The introduction of air can compromise the spray pattern and droplet size as the nozzle pulses off and on. As shown in the video below (at 3:18), this deterioration of droplet size is especially obvious upon the valve pulsing off, where residual air causes the application to dribble out from the air inlets-thus rendering the spray nozzle ineffective.
Now, new advancements have been made regarding air-induced nozzles regarding pulse-width modulation. TeeJet, for example, has several air-induced nozzles that have been approved for PWM use. However, your best bet is still to use non-air-inducted nozzles such as the Turbo TeeJet and Turbo TwinJet. The Greenleaf Soft Drop or Blended Pulse Dual Fan (BPDF) series or Wilger ComboJet series are good options, too.
Finally, an important point to remember when using PWM systems is that nozzle pressure is different than boom pressure. This is because nozzle pressure/flow is now controlled by the solenoids which are independent of your overall system's pressure reading. As the solenoids turn off and on, a pressure drop needs to be accounted for with higher boom pressure.
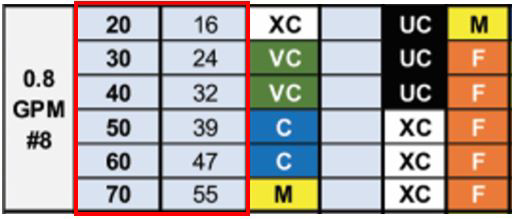
Difference between gauge pressure and nozzle pressure for an 0.8 nozzle.
For example, for a 110-04 spray tip, the average drop is only about 3 PSI. A larger 110-08 tip, however, will push the limits of the solenoid even further, creating a greater decrease in pressure. This can be anywhere from 6 PSI at 30 PSI gauge pressure to 13 PSI at 60 PSI gauge pressure! If the pressure drops too low, the nozzle won't be able to form a uniform spray pattern and droplet size. Therefore, the larger the nozzle orifice, the greater the boom pressure required to compensate.
PWM charts calculate against this pressure drop and offer speed ranges for operating specific nozzles at a given gauge pressure.
Sizing PWM Sprayer Nozzles
Alright, let's size some spray nozzles. A few things you'll need to know ahead of time:
- Target application rate
- Typical average speed
- Desired droplet size
Using these three components, you'll be able to quickly find the correct spray nozzle size for your PWM application.
Once you start looking at the charts, just like with conventional spray tips, you want to select a PWM nozzle which falls near the center of the pressure range for your desired droplet size. In most cases, this will be between 40 and 70 PSI for the best pattern and droplet size retention. However, it's difficult to suggest the proper droplet size and nozzle type for every application. As always, check your chemical labels for proper application droplet size before beginning.
Sizing Greenleaf PWM Nozzles
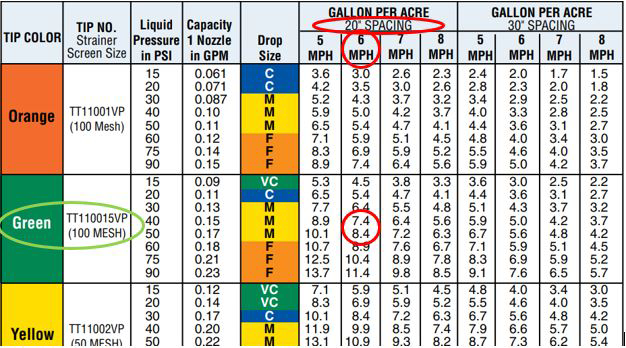
For this first example, we're going to find a nozzle within the Greenleaf line of spray nozzles using their PWM tabulation chart. To start, we take our target application rate, let's say 12.5 GPA on 20" spacing, and set our average speed at 15 MPH. Keep in mind we want to maintain a 75% duty cycle through the field. This means we can go as fast as 20 MPH (100%) or as slow as 5 MPH (25%) without exceeding our chosen nozzle's pressure rating or compromising our droplet size or application rate. Our droplet size for this example is Coarse to Very Coarse.
Next, moving down the 75% duty cycle column, we find where our average speed of 15 MPH falls within the 40 to 60 PSI gauge pressure range. Looking left, we see that the best fit is a 0.8 nozzle. We can also readily see that only one nozzle, the BPDF, will provide our desired droplet size.
We could've chosen an 0.7 nozzle, but we're already pushing the pressure limits of that nozzle at our speed. If our average speed was to increase by even one mile to 16 MPH, our droplet size would decrease to Medium. Choosing an 0.8 nozzle still retains our Course-Very Course droplet size even if we were to decrease pressure or speed.
Sizing TeeJet PWM Nozzles
TeeJet has a similar approach to sizing PWM nozzles, though their tabulation chart works a bit differently. Instead of providing you with the duty cycle columns, they simply display your minimum/maximum speed range. This means you have to calculate what the 75% duty cycle speed would be on your own. Once you have that however, you can quickly find your ideal spray nozzle.
In the example below, we chose to apply a 15 GPA at 10 MPH with a desired Ultra Coarse or Extremely Course droplet size. We actually have two nozzle options to choose from in this case-the Turbo TeeJet Induction (TTI) and TTI TwinJet (TTI60). Both are again in the 0.8 size.
We also have the Air-Inducted Turbo TwinJet (green box) with an XC droplet size if we wanted. However, the larger UC droplet size of the other two nozzles and the fact that they aren't air induction nozzles makes them better options.
Sizing Wilger PWM Nozzles Using the Wilger Tip Wizard
Wilger has made selecting their Combo-Jet nozzles for PWM systems even easier via their online Tip Wizard. Here, simply enter your GPA, speed, and target droplet size into the specific fields. You'll also enter nozzle spacing, spray tip angle, and which PWM system you're operating on. Many PWM systems, from Capstan PinPoint to Case AimCommand, Raven Hawkeye to John Deere ExactApply have different actuation speeds. The Tip Wizard will then provide you a list of the best nozzle options given your specifications.
For a complete guide to using Wilger's Tip Wizard and understanding results when sizing nozzles for PWM, click here. They even have a video walkthrough if you prefer that option.
Advantages of Using Pulse Width Modulation Nozzles
Although there is no indication that conventional spray nozzles will become obsolete in the near future, the rise of PWM nozzles will undoubtedly continue to assume an increasing share of the industry. And for good reason.
First, PWM spray nozzles allow you to maintain constant pressure across a wide range of speeds. Having a wider range of travel speeds means that even when speeding up or slowing down through the field, you retain the necessary pressure-and therefore droplet size-to correctly apply your desired chemical rate without sacrificing coverage.
Drift control is another benefit of using PWM nozzles. While PWM systems do not significantly improve drift control alone, they do make it easier. This is because they offer a wider speed range to work with, meaning you can use larger sprayer nozzles designed for coarser spray patterns. Even if you tweaked your pressure higher or lower, your duty cycle would internally adjust to apply the same application regardless of speed. The larger droplet sizes then allow you optimal drift control.
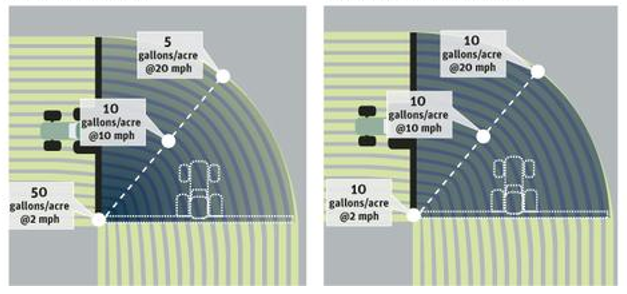
Illustration of turn application rates for conventional spray system with rate controller only (left) vs. a PWM system with nozzle-by-nozzle turn compensation capability (right)
Finally, greater precision. The consistency across numerous speeds means PWM spray nozzles provide incredible application accuracy. Reduction in chemical costs, fewer over- or underapplications, and less drift potential gives PWM operators much more control over their spray operation. Many systems today even have the capability of controlling individual nozzle flows. This nozzle-by-nozzle sectional control enables greater turn compensation and more accurate, site-specific application through the field.
This feature is especially important when turning around at the end of the row. When turning in a conventional sprayer system, the inner boom nozzles become effectively stationary and substantially over apply chemical. Meanwhile, the outside boom nozzles move faster than the application rate can be accurately applied. PWM systems featuring turn compensation such as Capstan's PinPoint overcome this by individually controlling each nozzle, maximizing efficiency and accuracy.
Final Thoughts
As industry leaders continue developing new, better PWM spray equipment systems, understanding PWM technology and how to apply it to your own operation becomes increasingly important. Not unlike sizing conventional sprayer tips, choosing the correct PWM spray nozzle plays an integral role in ensuring the accuracy and efficiency of your sprayer system. After all, your application is only as good as your spray tip.
For any questions regarding sprayer tip sizing and PWM spray systems, be sure to check us out at dultmeier.com or give us a call at 888-667-5054. We're happy to assist you with whatever questions you may have and provide you the technical expertise and diverse products necessary to get you back in the field. Let us help you find what you're after today so that you get the best sprayer performance possible.
Your Experts in Delivering Fluid Handling Solutions - WE KNOW FLOW!


